What to Expect During an Artificial Grass Installation: A Step-by-Step Guide
Artificial grass has become an increasingly popular choice for homeowners and businesses looking for a low-maintenance, aesthetically pleasing alternative to natural lawns. Whether you’re considering artificial turf for your backyard, playground, or commercial space, understanding the installation process can help you prepare and ensure a smooth project.
In this step-by-step guide, we’ll walk you through what to expect during an artificial grass installation, from initial preparation to the final touches.
Step 1: Planning and Measurement
Before any installation begins, proper planning is essential. This step ensures that the project runs smoothly and meets your expectations.
Assessing the Area
The first step is to evaluate the space where the artificial grass will be installed. Consider factors such as:
- The size and shape of the area
- Drainage requirements
- Existing landscaping features
- Sunlight exposure
Taking Accurate Measurements
Accurate measurements are crucial for ordering the right amount of artificial turf. Measure the length and width of the area, accounting for any curves or irregular shapes. If you’re unsure, a professional installer can help with precise measurements.
Step 2: Removing Existing Grass and Debris
Once the planning phase is complete, the next step is preparing the ground for installation.
Clearing the Area
All existing grass, weeds, rocks, and debris must be removed. This can be done manually with shovels or by using a sod cutter for larger areas.
Addressing Drainage
Proper drainage is critical to prevent water buildup. If the area is prone to pooling, a slight slope or a gravel base may be added to improve water runoff.
Step 3: Installing the Base Layer
A stable base is essential for the longevity and performance of your artificial grass.
Compacting the Soil
After clearing the area, the soil should be compacted to create a firm foundation. A vibrating plate compactor is often used for this step.
Adding the Base Material
A layer of crushed rock or decomposed granite (typically 3–4 inches deep) is spread evenly over the compacted soil. This material is then leveled and compacted to ensure a smooth, stable surface.
Step 4: Laying the Weed Barrier
To prevent weeds from growing through your artificial grass, a geotextile weed barrier is installed over the compacted base.
Securing the Barrier
The weed barrier is rolled out and trimmed to fit the area. It’s then secured with landscape staples or adhesive to keep it in place.
Step 5: Rolling Out the Artificial Grass
With the base prepared, it’s time to lay the artificial turf.
Positioning the Turf
The artificial grass is rolled out over the weed barrier, ensuring the blades face the same direction for a uniform appearance. Allow the turf to acclimate for a few hours to relax any wrinkles.
Trimming and Shaping
Using a utility knife, the turf is trimmed to fit around edges, curves, and obstacles like trees or garden beds. Careful cutting ensures a seamless look.
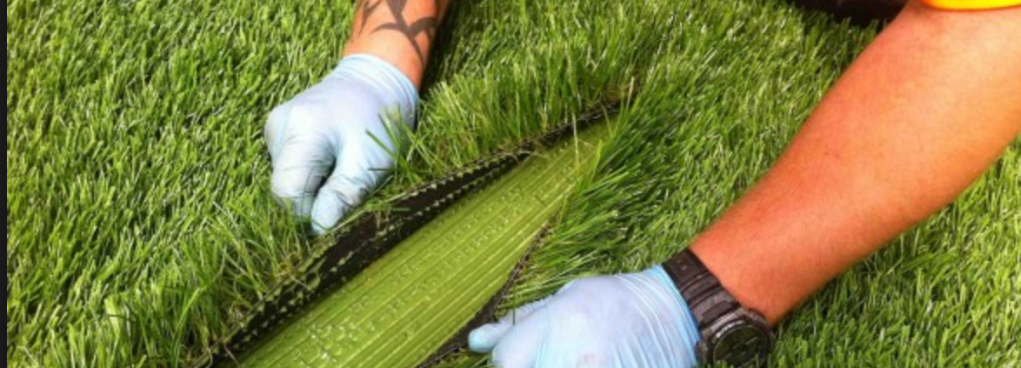
Step 6: Seaming and Joining (If Necessary)
For larger areas, multiple rolls of artificial grass may need to be joined together.
Aligning the Seams
The edges of the turf pieces are carefully aligned to create an invisible seam. Special adhesive and seam tape are used to bond the sections securely.
Applying Pressure
Once the adhesive is applied, weight is placed on the seams to ensure a strong bond as it dries.
Step 7: Securing the Edges
To keep the artificial grass in place, the perimeter must be secured.
Using Landscape Staples or Nails
Galvanized nails or landscape staples are driven along the edges of the turf, spaced about 6 inches apart, to anchor it firmly to the ground.
Finishing with Edging (Optional)
For a polished look, some installations include plastic or metal edging around the perimeter.
Step 8: Adding Infill Material
Infill is spread over the artificial grass to provide stability, cushioning, and a natural look.
Choosing the Right Infill
Common infill materials include silica sand, rubber granules, or a mix of both. The type of infill depends on the intended use (e.g., playgrounds may require softer rubber infill).
Spreading the Infill
Using a drop spreader or broom, the infill is evenly distributed across the turf. A power broom is then used to brush the infill into the grass fibers, helping the blades stand upright.
Step 9: Final Grooming and Inspection
The last step involves ensuring the artificial grass looks perfect and functions as intended.
Brushing the Turf
A stiff brush or power broom is used to fluff up the grass blades, giving the lawn a natural, lush appearance.
Checking for Imperfections
The installer will inspect the area for any loose seams, uneven spots, or visible staples, making adjustments as needed.
Step 10: Enjoying Your New Artificial Lawn
Once the installation is complete, your artificial grass is ready for use.
Maintenance Tips
While artificial turf requires minimal upkeep, occasional brushing and rinsing will keep it looking fresh. Remove debris and hose it down as needed to maintain its appearance.
Long-Term Benefits
With proper installation, your artificial lawn will provide years of beauty and functionality without the need for watering, mowing, or fertilizing.
Conclusion
Installing artificial grass is a detailed process that requires careful planning and execution. By understanding each step—from site preparation to final grooming—you can ensure a successful installation that enhances your outdoor space. Whether you’re tackling the project yourself or hiring professionals, this guide helps you know what to expect every step of the way.
Now, sit back and enjoy your low-maintenance, evergreen lawn!
